- Amir Boroumand | Software engineer based in Pittsburgh, PA/
- blog/
- Adding SSL/TLS to a Web Application using AWS Application Load Balancer/
Adding SSL/TLS to a Web Application using AWS Application Load Balancer

Overview #
In this article, I demonstrate how to add SSL/TLS to a web application running on AWS EC2 by configuring an application load balancer in front of it.
I will show how to perform each step in two different ways: the AWS Management Console and the AWS CLI (version 2).
I am going to assume you have a couple items setup already:
- An EC2 instance running a web server on port 80.
- A domain whose DNS is hosted by Route53.
Target AWS Architecture #
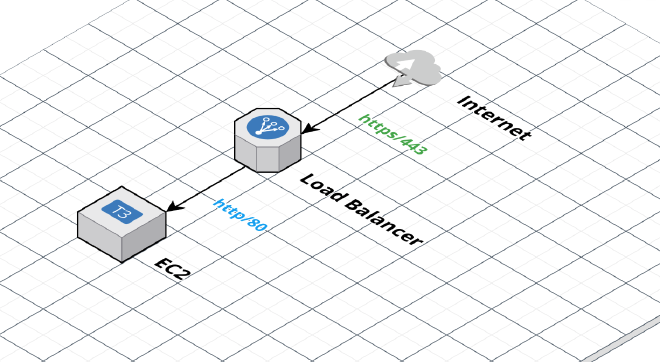
Here’s a diagram that illustrates our target architecture.

Create SSL/TLS Certificate #
First, let’s create an SSL/TLS certificate using AWS Certificate Manager. We’re going to use api.example.com as the Common Name for our certificate.
AWS Management Console #
Go to https://console.aws.amazon.com/acm/ and follow the steps below.
- Click the Request a Certificate button
- Select Request a public certificate and click Next
- Enter
api.example.cominto the Fully qualified domain name field - Make sure DNS Validation is selected
- Click the Request button
AWS CLI #
aws acm request-certificate \
      --domain-name api.example.com \
      --validation-method DNS
Create EC2 Target Group #
Next, let’s create a target group. A target group is a logical grouping of EC2 instances that can receive traffic from a load balancer.
We’ll create a target group named app-target-group configured for HTTP traffic on port 80 with a health check at /. And then we will register our EC2 instance into the target group.
AWS Management Console #
Go to https://console.aws.amazon.com/ec2/ and follow the steps below.
- Click Target Groups on the left menu
- Click Create target group
- Make sure the target type of Instances is selected
- In the Target Group Name field, enter
app-target-group(Note: you cannot change the name later) - Change the Port to 80
- Under Health Checks > Health Check Path, make sure the path is
/ - Click Next
- Select the EC2 instance from the list of available EC2 instances
- Click the Include as pending below button
- Click the Create Target Group button
AWS CLI #
The first command creates the target group. Replace VPC_ID below with your VPC ID. Copy the target group ARN from the output to use in the next command.
aws elbv2 create-target-group \
      --name app-target-group \
      --protocol HTTP \
      --port 80 \
      --target-type instance \
      --vpc-id VPC_ID
The next command registers our EC2 instance into the target group. We need the target group ARN and our EC2 instance ID for this command.
aws elbv2 register-targets \
    --target-group-arn TARGET_GROUP_ARN \
    --targets Id=INSTANCE_ID
Create Application Load Balancer #
Next, we’ll create the application load balancer that will accept HTTPS traffic on port 443 and forward the requests to our application on port 80.
AWS Management Console #
Go to https://console.aws.amazon.com/ec2/ and follow the steps below.
- Click Load Balancers on the left menu
- Click Create Load Balancer button
- Under Application Load Balancer, click Create
- Enter
app-load-balanceras the load balancer name (Note: you cannot change the name later) - Leave the scheme as Internet-facing which is the default
- Leave the IP address type as IPv4 which is the default
- Under Network mapping, select the VPC that the target group is in.
- Select all the listed availability zones.
- Under Security groups, create a security group which allows HTTPS 443 from the Internet (
0.0.0.0/0) and select that one. - Under Listeners and routing, select HTTPS and port 443 and then select the target group from the dropdown list.
- Under Default SSL certificate, select the certificate we created.
- Click Create load balancer
AWS CLI #
The first command creates the load balancer and maps it to subnets in our VPC. Replace the subnet IDs with your own.
aws elbv2 create-load-balancer \
    --name app-load-balancer \
    --subnets SUBNET_ID_1 SUBNET_ID_2 SUBNET_ID_3 SUBNET_ID_4 SUBNET_ID_5 SUBNET_ID_6
The second command creates the HTTPS listener on port 443 for the load balancer and configures it to use the certificate we created earlier. We need three ARNs for this command: the load balancer ARN, the certificate ARN, and the target group ARN.
aws elbv2 create-listener \
    --load-balancer-arn LOAD_BALANCER_ARN \
    --protocol HTTPS --port 443  \
    --certificates CertificateArn=CERTIFICATE_ARN \
    --default-actions Type=forward,TargetGroupArn=TARGET_GROUP_ARN
Verify Security Group Configuration #
Our security group configuration must adhere to two rules in order for us to get our solution working:
- The EC2 instance must allow traffic to port 80 from the load balancer.
- The load balancer must allow traffic to port 443 from the Internet (0.0.0.0/0).
If the EC2 instance and load balancer are both assigned to the default security group, then the first rule is taken care of. The second rule is handled in step 9 of Create Application Load Balancer step.
There are many other ways to configure security groups. You can refer to the AWS documentation here.
Testing #
Now, let’s test out the solution by going to https://api.example.com
